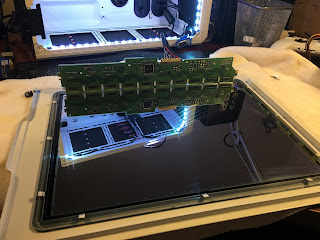
So I got my new lcd panel and driver board, and I thought I'd share a bit of how easy it is to turn a bare panel into a transparent case window display.
First I hooked up the display and made sure the thing actually worked, and had the correct resolution.
I install the display upside-down because if I didn't the LCD board would get in the way of the motherboard.
Interesting 1680x1050, I was expecting to see 1400x1050 here. Hey I'll take it, still better than the 1024x768 of the old panel.
Here's the old display with it's Huge driver board. This board would have prevented me from using a MATX motherboard.
Here's the new display driver board compared to the old one, It's quite the size difference.
So having removed the old setup it's time to prepare the new display panel.
I put down a cloth to protect the display from scratches.
I go around the metal frame of the display and remove all the screws. I also bend up all the little tabs that hold the metal and plastic frames together.
This i the backlight inverter board. It's what powers the backlight in the display.
This board gets tossed as the backlighting will be provided by the 5050 LED strips in the case.
Once I have the plastic frame, which houses the backlight, free it can be removed.
Toss this in the garbage.
Then I remove all the light scattering sheets. They get tossed too.
Then remove the panel from the metal frame. This is the only thing I want to keep.
Here you can see it's not 100% transparent. The dark polarizing filter on the front of the display kind of darkens and clouds it a bit, but it's not too bad.
And here's just the new panel that will go into the side window.
I then clean the panel and case window to remove any fingerprints, and then place it on the case side panel.
I use some gaffers tape to hold the display in the side panel.
I do this because gaffers tape offers a fairly strong bond, and if ever I need to remove the display it won't leave any residue.
Here's the new display all ready to go, but first I need to put the new display driver board in somewhere.
I'll probably border the display with the LED strips, but for now I am just using some magnetic strips inside the case as temporary lighting. I can't do the final LED install until the rest of the PC gets put together.
I'll put the display driver board in the back cavity of the Corsair Air 240.
I had some foam from that was in my power supply box.
I cut it out the right size for the display driver board and control button board.
This is so the boards don't short out on anything.
Once I have the board insulated I put on some velcro strips.
This seems like a good spot. I have the driver board under the SSD bay, and the control buttons on the HDD bay.
The HDD bay won't be used at all , so I have the raspberry Pi Zero installed here.
It's sole job is to run my video loops.
I also installed a VGA splitter box. This will allow me to switch between the Pi Zero and my PC driving the display. I intend to run like Rainmeter on the case window for cool stuff and whatever I throw up on it. Then when I don't care whats on it I turn it back to the Pi Zero to just run the looping videos.
I ordered some shorter VGA cabels as this one is just too long.
Then just close the whole thing up, and there you go one fully functional transparent LCD side window display.
And here's ROG logos cause that's part of this builds theme.
I also put up a new YouTube video testing it out quick with the LEDs flashing different colors.
I'll put up another post wherever there's something new. Kinda on a holding pattern now. Still waiting for Ryzen to be released, and more importantly doing the taxes to actually pay for the parts.


