Wednesday, July 12, 2017

Star Citizen 3D Printed MISC Prospector


Well this is my ship in the Verse, and I wanted to make something to sit on my desk.
I cleaned up the Holoviewer model off the Star Citizen website.
You can get the .stl model here on Thingiverse
I also have the other ships I've done on there.

Printed it out on my 3D printer and gave it a quick paint job.


Thursday, July 6, 2017

3D Printing Star Citizen ships

So I've been talking with my guild in Star Citizen, and many like 3D printed Star Citizen ships.  However many of the 3D .stl models that are found on sites like Thingiverse have many errors.  If you were to try to print them they have hollow parts, holes, and just aren't really printable.

Well I wanted a 3D print of my ship the MISC Reliant Tana Skirmisher. There wasn't any .stl file that I could find so I decided to make my own.

I took the Holoviewer .ctm model off the Star Citizen site and imported and converted it into an .stl model.

I spent some time removing the interior geometry, filling holes, and thickening the walls to make it printable.  I also split the model and made spots to put a magnet in to allow rotation.

It took some time but turned out well.


I then started getting requests for my guildmates to do some more ships, so I ended up with doing a few more.
I've been putting them up on myminifactory.com and Thingiverse under my username Furysend.

The ships that I've done are.
Misc Reliant Tana
Anvil Terrapin
Anvil Hornet Ghost
Misc Freelancer
Misc Prospector

I'm open to more requests.

Tuesday, April 25, 2017

Quick PC Build Update

So finally got this PC built.
Still working out all the kinks.
The Trident Z RGB lighting software is still in beta and doesn't work all the time.
I'll probably make a YouTube video once I get it all sorted out.

All Guitar Parts Printed


Quick update for a week of printing

Printed the upper part of the guitar


Ran into a small problem of my cooling fanduct getting warped and hitting the print, so I just removed it.
I'll have to find a better design for a fanduct.
 Here's 3 of the parts put together.
 Printing the final part.
This part took 38hours to print.
 It turned out pretty good.
I was nervous the whole time the print would fail.
Used about half a spool of filament on this part.
 Now to remove all the supports.
 And all the parts put together.

I'll be taking it to a guitar shop tomorrow to make sure the neck and bridge get mounted straight.


Saturday, April 15, 2017

2 parts down, 3 to go

The guitar lower part finished in 14hours 45mins, and it turned out pretty good.


Here is the part after all the supports have been removed.


And the two pieces I have completed so far.


I moved my printer to a new location, and put it in a cheap temporary enclosure.


I then started the 35hour print of the main guitar center piece.
This is the part that the neck bolts on to, and holds all the tension from the strings.  This is the key part of the guitar.


12 hours into the print, and it's starting to take shape.


Wednesday, April 12, 2017

3D Printed Guitar Project

So I started a rather ambitious 3D printed guitar project.
I decided to make this guitar after seeing it on Thiniverse

I went to my local Music Go Round and picked up a used guitar to donate it's neck.
I found a Lotus guitar

With the Lotus neck I decided to call this the Black Lotus guitar.
I first printed the Backplate.

And now I just started on part of the body, it's going to be a 15hr print for this part.
I'll keep posting updates.


Wednesday, March 22, 2017

Still waiting on that motherboard

Well at least the motherboard I am wanting to get has officially been announced now.
But until I can actually order the thing I added a front panel display now.
It's pretty much a digital picture frame that just cycles threw images.


Sunday, March 12, 2017

3D Printer

I've liked the 3D printed parts that I had made for my PC that I decided to buy a 3D printer for myself.

I went ahead and bought the Tevo Black Widow.  I got an unassembled kit as I wanted to put it together myself so I can learn about all it's working parts so if anything ever needed replaced I would know how to do it.

The Black Widow has a huge build size.   This will let me build all sorts of things, and not just for my PC.


Wednesday, March 8, 2017

Just need a motherboard

So pretty much everything is in now, but the motherboard.

Looking to get the MSI B350M Mortar Arctic.
I've seen it available for pre-order in Australia but nowhere yet for the US.

Saturday, February 25, 2017

Loot

Got a few parts in for the new pc.
32Gb of G.Skill Trident Z RGB memory, HP Omen mouse, and a Corsair Strafe RGB w/ MX Silent switches.

Testing mouse and keyboard, they work as expected.


Here's the custom keycap I had made for the keyboard to fit this build.


Also installed the painted gaskets.


Friday, February 24, 2017

Ryzen is a good OMEN

And with pre-orders for Ryzen now available, It's now time to start my Ryzen PC build.


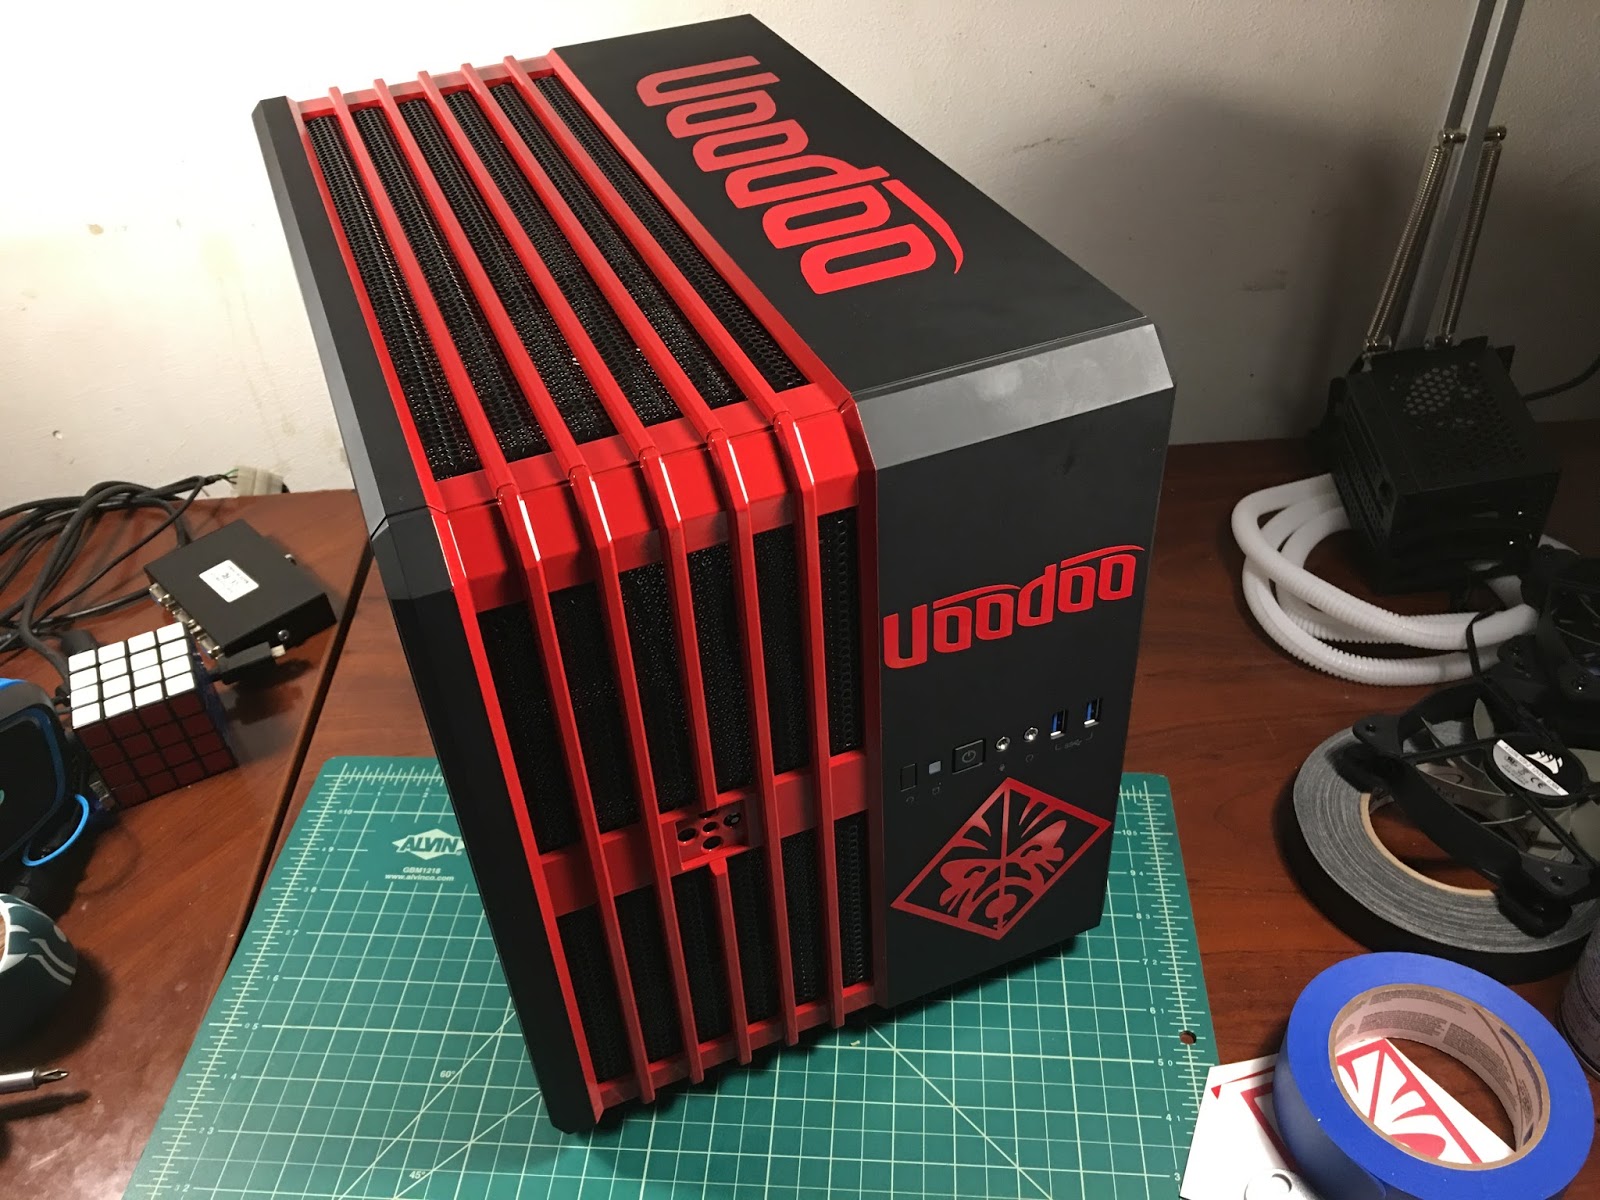
I've alway liked the VooDoo, now HP Omen brand, and as I am getting their HP Omen 32 QHD Display for my PC I figured I may as well make a matching case.

With a new Black Corsair Air 240 case I first strip it down to its frame.


All the grills and dust filters are removed.


I coat the rubber grommets with a white flexible rubber coating.


I mask of and paint the side panels


I take the side air filter and mask it of with the lower half of the Omen logo, and spray paint it red.


After things are done drying I carefully remove the mask.


 I  put back on the grills on the side panels.


The case interior is painted white.


I apply a vinyl sticker of the upper half of the Omen logo to the side panel.


 I put the painted air filter on.


Then all the panels get installed back on.


I add on more vinyl graphics to the case.


Looks good.


I swapped out the velcro with some magnetic mounts for the display driver board and Raspbery Pi Zero.


A 3D printed case for the Pi Zero.  Thing is this will be hidden inside the case so it'll never be seen.


I install the side window display.


Light leaks need to be taped off.


Then trim the corners.


And here the case is pretty much ready for the components.
I'll put in the painted rubber gaskets tomorrow as they need 24 hours to cure.


More parts start coming in tomorrow.